Warning
Lime Inbox is being deprecated in favor of the Email Integration. Lime Inbox should NOT be implemented in new projects.
Configuration
Azure Enterprise Application setup
Lime Inbox requires an Azure application to function. An Azure application is
refered to as a client below. Basically a client is used to communicate with
the Microsoft Graph API and will provide us with client_id,
tenant_id, and client_secret. We run this as a daemon application so there is no user interactions.
Warning
Steps 1-3 of the configuration needs to be done by the customer Admin in Azure.
To configure this we need to complete these steps in the Azure portal portal.azure.com:
1. Create and register an application [Customer]
Info
We suggest to create a separate dedicated application but you can use an existing.
Follow the guide to register an app: Link to guide to register an app
- Give it a unique name
- For Supported Accounts Types, it depends on the setup. If it's managed from a directory (single tenant), use "Accounts in this organizational directory only"
- Usually we use the
Single tenantoption
- Usually we use the
- For Redirect URI
- Select Web
- Leave Uri Empty
2. Add client secret [Customer]
Info
This secret will have an expiration date, this is up to the customer to keep track of. Inbox will stop working completely when the expiration runs out.
Now follow this step to create a client secret: Link to guide to add a client secret
When created you will see the client secrets. We only need the Value and not Secret ID
Warning
IMPORTANT! Copy the client secret value and store it somewhere safe! Lime will need these at later step.
If you refresh the page it is lost forever!
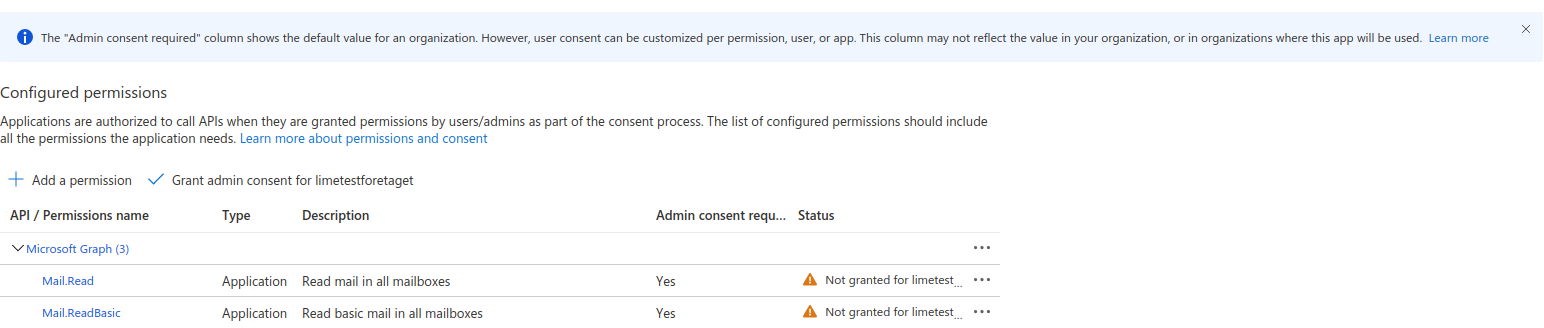
3. Setup permissions (Add API Permissions) [Customer]
Follow this to setup permissions: Link to guide to setup permissions
- These permissions should be added as
Application permissionsMicrosoft Graph->Application Permissions->Mail.ReadMicrosoft Graph->Application Permissions->Mail.ReadBasicMicrosoft Graph->Application Permissions->Mail.ReadWrite
- Grant admin consent to these permissions
Warning
IMPORTANT! Someone needs to accept these permissions if you're not an Global Admin yourself.
Will be marked by a yellow exclamation (image below)
Permissons levels
Info
Per default Microsoft grants access to all Inboxes. If the customer wants to limit the access of the application to a specific mailbox, see Limiting application permissions to specific Exchange Online mailboxes (Microsoft Docs).
4. Update Lime CRM's application config [Lime]
Update Lime CRM's application config with the credentials and secret from the customer. Go your application config and replace the following:
<client_id><tenant_id><client_secret>
Info
You can find the client id and tenant id from the customers application overview page.
At this point, try restarting your app server and then go to the lime admin section again. Clicking validate should now succeed if you have correctly setup your Azure Enterprise application.
If it doesn't work, check out Troubleshooting for common issues and how to solve them.
Application Config
The application_config.yaml file (or config tab in CAFE)
contains some settings for inbox but mainly the available clients.
Info
Lime Inbox support the use of several Azure Applications in one Lime Application. This is done by adding several <client-names> with corrensponding configurations and secrets in your application_config.
Configuring clients
A client in this context is a connection to the Microsoft Graph API which is needed to connect and authenticate.
Where client-id, tenant-id and client-secret are used to authenticate to a specific Enterprise Application in Azure.
These values are created and given to the consultant by the customer (See azure enterprise application setup on how to set this up)
However, you should be able to verify that a client shows up in Lime Admin
if you add the config above in the application_config.yaml file.
Replace <my-application> with your solution name, and put whatever you want
for client_id, tenant_id and client_secret. (<my-client-name> is the name
of your client and can be set to whatever you want)
If you go to Lime Admin after this your should see something similar to this:

You can click Validate it checks that you have provided valid ids and secret.
If something is wrong you should recieve an error message in the bottom of this page.
To fix this we need correct values for client_id, tenant_id and client_secret.
Inbox settings
Usually you don't have to set any of these, but can sometimes be needed.
| Name | Required | Default value | Description |
|---|---|---|---|
config.limepkg_ms_inbox.custom_select |
No | [] |
A list of additional $select properties to send to Ms Graph api, read more about it here. |
Config examples
Don't forget to replace everything inside <>
Standard config
<my-application>:
    config:
        limepkg_ms_inbox:
            <my-client-name>:
                client_id: <client-id>
                tenant_id: <tenant-id>
    secrets:
        limepkg_ms_inbox:
            <my-client-name>:
                client_secret: <client-secret>
Full config with all settings
Warning
This is just an example to show the structure of the config.
The values would not work in a live environment
<my-application>:
    config:
        limepkg_ms_inbox:
            custom_select:
                - custom_field_1
                - custom_field_2
            <my-client-name>:
                client_id: <client-id>
                tenant_id: <tenant-id>
    secrets:
        limepkg_ms_inbox:
            <my-client-name>:
                client_secret: <client-secret>
Lime Admin Configuration for resources.
After successfully validating your client you should see a new section with resources in the Lime Admin page for the addon.
1. Create function for handling the emails
Error handling
If you have error handling in your code. Keep in mind that if you don't raise an exception the message will be deleted and not set to status Failed. So if you want to log some specific message make sure to raise the exception again after that.
See example below:
try:
    value = 1 / 0 # This will raise an exception
except ZeroDivisionError:
    logger.warning("Failed to divide by zero")
    # The row below will raise the original exception so the
    # message will be marked as failed instead of removing it in the inbox.
    raise
Are you using Communication flow aswell?
If you're not comfortable with coding there's a Configuration for dummies where you can copy/paste "everything" and can skip the rest of this documentation.
To be able to do something with the emails we are picking up you'll need a function that handles them.
This function should be placed in the tasks module. If you don't have that module already you can generate it using lime-project
It can be done using this command: lime-project generate tasks
You can use and modify this example to do any kind of custom logic that you want:
Example with the simplest default logic
import limepkg_ms_inbox.behaviours as inbox_behaviours
from lime_application import LimeApplication
from limepkg_ms_inbox.ms.api.decorators import process_email_function


@process_email_function
def process_email_message(app: LimeApplication, email_data: dict) -> bool | None:
    uow = app.unit_of_work()
    email_item = inbox_behaviours.EmailItem(email_data)
    if inbox_behaviours.have_email_been_processed(app, email_item):
        return False
    elif email_item.is_autoreply:
        return
    helpdesk = inbox_behaviours.process_email(
        app=app,
        email_item=email_item,
        uow=uow,
    )
    uow.commit()
Example customizations
How to implement the customization
Use the above default behaviour and just replace the _handle_email_message function
Set helpdesktype based in inbox address
@process_email_function
def process_email_message(app: LimeApplication, email_data: dict) -> bool | None:
    uow = app.unit_of_work()
    email_item = inbox_behaviours.EmailItem(email_data)
    if inbox_behaviours.have_email_been_processed(app, email_item):
        return False
    elif email_item.is_autoreply:
        return
    helpdesk = inbox_behaviours.process_email(
        app=app,
        email_item=email_item,
        uow=uow,
    )

    # Custom adjustments for your solution:
    # Set helpdesk_type based on what inbox received the email
    helpdesk_types = {
        "my_inbox@domain.com": 1002,
        "my_other_inbox@domain.com": 1337,
    }

    if email_item.subscription_email in helpdesk_types:
        helpdesk_type_id = helpdesk_types[email_item.subscription_email]
        try:
            helpdesk_type = app.limetypes.helpdesktype.get(helpdesk_type_id)
            helpdesk.properties.helpdesktype.attach(helpdesk_type)
            uow.add(helpdesk_type)
        except Exception:
            logger.warning(f"failed to set helpdesktype: {helpdesk_type_id}")

    return uow.commit()
Re-open closed helpdesk
Warning
This example is hard coded with property helpdeskstatus and keys: done parked and started
@process_email_function
def process_email_message(app: LimeApplication, email_data: dict) -> bool | None:
    uow = app.unit_of_work()
    email_item = inbox_behaviours.EmailItem(email_data)
    if inbox_behaviours.have_email_been_processed(app, email_item):
        return False
    elif email_item.is_autoreply:
        return
    helpdesk = inbox_behaviours.process_email(
        app=app,
        email_item=email_item,
        uow=uow,
    )

    accessor_helpdeskstatus = helpdesk.properties.helpdeskstatus
    if helpdesk.is_new is False and accessor_helpdeskstatus.value.key in [
        "done",
        "parked",
    ]:
        accessor_helpdeskstatus.set_by_key("started")


    return uow.commit()
Create a new helpdesk when receiving e-mail on a closed helpdesk
Warning
This example is hard coded with property helpdeskstatus and keys: done
@process_email_function
def process_email_message(app: LimeApplication, email_data: dict) -> bool | None:
    uow = app.unit_of_work()
    email_item = inbox_behaviours.EmailItem(email_data)
    if inbox_behaviours.have_email_been_processed(app, email_item):
        return False
    elif email_item.is_autoreply:
        return

    existing_helpdesk = inbox_behaviours.find_helpdesk_by_subject(
        app, email_item.subject
    )

    force_new_helpdesk = False
    if (
        existing_helpdesk
        and existing_helpdesk.properties.helpdeskstatus.value.key == "done"
    ):
        force_new_helpdesk = True

    helpdesk = inbox_behaviours.process_email(
        app=app,
        email_item=email_item,
        uow=uow,
        force_new=force_new_helpdesk,
    )

    return uow.commit()
Info
There are tools available as you see above to help you handle whatever logic the customer is asking for. You can find the documentation for that here
email_data is of type dict and contains a email message.
The email-message includes a variety of properties, e.g.
subject, bodyPreview, subscriptionEmail, attachments and so on.
Be sure to use the wrapper EmailItem to easier use these properties
2. Add the resource (subscription to an email mailbox) in Lime Admin
Go to Lime Admin => Settings => Lime Microsoft Inbox => Your valid client
In the bottom of the second section you'll see an Add button, click it and fill in the form:
Email is the email-address that you want to monitor and it should be accessible by
your Azure Enterprise Application if it was setup correctly.
Inactive Ticking this box will make lime-inbox ignore all incoming emails. They will instead show up as unprocessed.
3. [Optional] Configure auto reply
When creating for example a helpdesk a common scenario is that you want an auto reply to be sent to the customer saying that we received your e-mail and this is your ticket number.
If you use the standard behaviour functions for MS Inbox. We will store the subscription e-mail on the helpdesk in a hidden field that can be used as "from address" when sending the e-mail. That way you can have multiple inboxes setup and the correct e-mail address will be used for each auto reply.
All sendouts are done in the customer's own solution, but we have some help functions/classes that you can use for setting it up easily. We use TRAML2, so you need to setup a Lime Marketing account for the customer for this to be used.
In order for Lime to send emails from a company domain, permissions needs to be granted by the domain owner. You can find instructions here.
Custom Limeobject for helpdesk
Create a custom limeobject for helpdesk and add the logic in after_update.
This is just an example and you may change it to whatever you'd like.
import logging

# TODO: Add new traml imports
import limepkg_ms_inbox.behaviours.helpdesk.traml as inbox_traml
import limepkg_transactional_message_library.traml as traml_lib
from lime_type.limeobjects import LimeObject

logger = logging.getLogger(__name__)


class Helpdesk(LimeObject):
    def after_update(self, unsaved_self, **kwargs):
        super().after_update(unsaved_self, **kwargs)

        # TODO: Add this call in the end of after_update
        _send_traml_message(self, unsaved_self)


def _send_traml_message(helpdesk: LimeObject, unsaved_helpdesk: LimeObject):
    if not unsaved_helpdesk.is_new:
        return

    app = helpdesk.application
    traml = traml_lib.TramlClient(app)

    # Step 1: Fetch template
    try:
        # TODO: Change to the template the customer will use
        traml_template = traml.get_mail_template_by_name(
            "lime-inbox-autoreply"
        )
    except traml_lib.models.TramlError as e:
        logger.warning(f"Failed to fetch template due to {e}")
        return

    try:
        # TODO: Change to whatever default email should be used
        message_meta = inbox_traml.get_helpdesk_message(
            helpdesk,
            "default_helpdesk@customer-domain.com",
        )

        # TODO: add any potential customer specific merge_codes
        merge_codes = {
            **message_meta.merge_codes,
            # Optional to add custom merge_codes
            "$$my.custom.merge_code$$": "This is just for fun",
        }

        # Step 2: Send traml email
        email_model = traml_lib.models.Email(
            # TODO: Change to whatever the customer wants
            from_name="Lime Helpdesk",
            from_email=message_meta.from_email,
            recipient_name=message_meta.recipient.name,
            recipient_email=message_meta.recipient.email,
            subject=message_meta.subject,
            merge_codes=merge_codes,
            headers=message_meta.headers,
            exclude_totaloptouts=True,
        )

        traml.send_transactionmail_by_template(
            template_id=traml_template.id,
            message=email_model,
        )

    except traml_lib.models.TramlError as e:
        logger.warning(
            f"Failed to send autoreply for: {message_meta.subject} due to: {e}"
        )
        # TODO: Handle TramlError
        # (Remove if you want it to fail on error)
        raise


def register_limeobject_classes(register_class):
    register_class("helpdesk", Helpdesk)
The subject will be set to the helpdesk title and then the helpdesk number
inside square brackets for example: My title of helpdesk [abc123]
There are some default merge_codes that will be added automatically:
| Name | Description |
|---|---|
$$helpdesknumber$$ |
The helpdesk number of the created helpdesk |
4. [Optional] Configure Status addon on start page
Messages can be stuck in status Unprocessed if for example the scheduled task isn't running and the webhook for some reason didn't send the notification. If an error occur while processing a message it will be set to status Failed and will not be imported.
You can see this by going into Lime Admin and check status for each inbox, OR you can use the Status addon to see a summary directly on the start page.
-
Configure who can access/see the inbox summary, by going to:
Settings=>Lime Microsoft Inbox=>Status Addonand choose which groups that should have access. -
Add it on a start page, by going to:
System=>Start PagesAnd set the following settings:
- Name:
lwc-limepkg-ms-inbox-status-addon - Size:
Small rectangle
- Name:
You can also set the following Properties if you want:
| Name | Type | Default value | Description |
|---|---|---|---|
| showInactive | boolean |
false |
If inactive inboxes should be shown in the summary or not |
| showAll | boolean |
false |
If the summary should show all inboxes even valid ones |
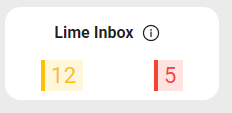
This will show a summary inboxes contaning one of the below:
- All failed messages in all inboxes
- All unprocessed messages, that's been there more than 5 minutes in all inboxes (This so that we shouldn't see messages that's being processed or if a notification is taking some time to be sent)
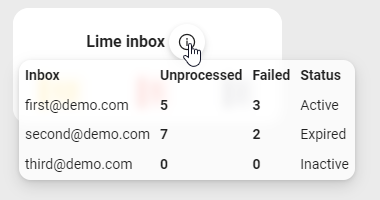
- Status of each inbox
Active,ExpiredorInactive(ifshowInactiveis enabled)
If there aren't any Expired inbox or failed/unprocessd message the summary won't show at all in the start page (unless showAll is enabled)
How it looks
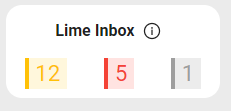
Summary
5. Sum up
At this point, we are almost ready to start fetching emails. Every 5 minutes the scheduled task will read all emails in your inbox and then delete them.
Info
Note that the only mailbox folder that's monitored is the one called Inbox.
By default this mailbox exists for every setup Outlook email.